A few months ago I discovered Cake Pops. I thought they were the most adorable things I had ever seen, but had no clue how to make them. I did think that they would be far to tricky for me to tackle because they are so intricately detailed with fondant icing and fancy tricks. I even asked my local cake decorating shop if they were offering classes and the answer was "No, they are too much trouble to be worth it". Suitably put off, I consigned them to the back of my mind. Until two days ago, when a friend of mine popped up on my Facebook with a picture of some Cake Pops she had won. Her comment was "I bet you could make these Jen!".
Challenge accepted!
The first thing I had to do was figure out how to make them. I was clueless, so I went to my trusty research assistant, Google, and asked the magic question "How do I make Cake Pops". Why didn't I do this months ago? All the information was right there, and they didn't look tricky at all! Obviously the fancier ones would be too much for me, but the ones with sprinkles looked right up my alley.
(I have actually encountered some stumbling points along the way, so today's blog is going to be a bit more of a show and tell than normal. I have a number of step by step photos of what I did. Mostly because it is different than I expected. If you want to give these ago, I hope my instructions help you avoid the problems that I had.)
The first thing I needed to do was have all the ingredients ready. I've been watching MasterChef this year, and they focused a lot on the "mise en plus" which basically means everything in it's place. So this is my "mise en plus" for the cake pops.
You will need chocolate for melting to cover your cakes. Here you can see I have milk and white chocolate. You will also need Lolly Pop Sticks to put the cake pops onto. The third thing in this picture is the tub of frosting at the back. If you are using one cake, you will need about half of this tub of frosting. I used Betty Crocker Chocolate Frosting with my chocolate cake. The flavour is great!
Disclaimer: The recipe I followed was from the US. If I was making these again, I wouldn't use the same quantities. What I am going to do instead is suggest that you start smaller and work up to it. There are far too many pops to make with the quantities you see in my picture.
So, as you can see I have two cakes. You are going to need one cake. I've made our standard chocolate cake, but you could use a packet mix if you don't have a cake recipe you make yourself. It doesn't need to be a fancy cake, you are going to turn it into crumbs in the food processor anyway! Other than the cake and the food processor you are going to need a large mixing bowl and a spatula. The bowl you see in the picture would be sufficient for one cake. As you will see in my next lot of pictures, I used a different bowl because the two cakes crumbed were too much for the bowl here.
Once you have the cake crumbs and the frosting ready, you mix them together until they are a truffle like consistency. If the mixture is too dry then it won't form into balls correctly, they will crumble apart. It's very important to make sure you get the right consistency. After I had mixed the frosting through, I kneaded it to get the mix to combine completely.
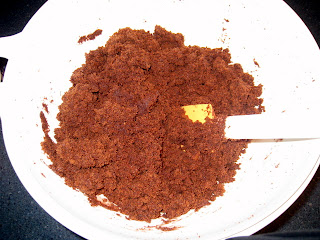 |
| The cake crumbs with the frosting - starting to mix them together. |
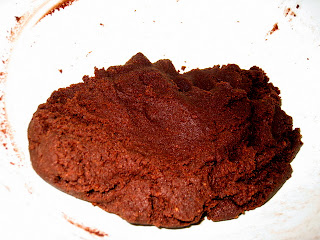 |
| Sorry for the glare (blame the lack of photography skills). This is what the mixture looked like after some kneading. |
When you have a lovely mix to play with you can make balls out of it. You don't want the balls to be too large, or they will fall off the lolly pop sticks when you are coating them later. All the tips I read online suggested that you should make the balls about 1 inch in size. I found that 1 tablespoon of mixture was the right amount for me.
After the first couple of tries I got my rhythm going, then the balls were easy to make. I lined some trays with baking paper and managed to get 2 dozen on each tray. As I mentioned earlier, you probably won't want to make the amount that I have made. One cake will most likely generate about 28 - 30 balls.
 |
| That's a whole lot of cake balls! |
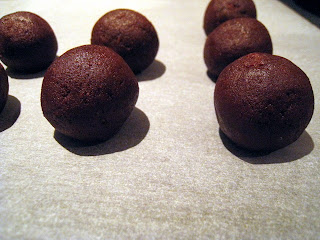 |
| Even without the coating they look pretty yummy! |
I would recommend making the cake balls the day before you are ready to decorate them. You need to put them in the fridge after they have been rolled so that they are chilled through before the next step. If you don't, you will find them difficult to work with and they won't stay on the lolly pop sticks as well as you would like.
Next you will need to melt some of the chocolate to glue the lolly pop sticks in. Each of the balls will have a flat spot from resting on the tray. I used one stick as a guide and pressed it into each ball to make a hole halfway into the ball. Then I went back and glued the sticks in each ball.
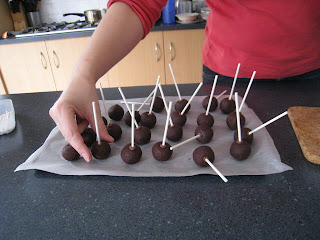 |
| Obviously my cake balls aren't perfectly round. Look at all the crazy directions they are pointing! |
Then it's back into the fridge again to set the chocolate glue and let them rest before coating them in chocolate and beginning the decorating process.
I started off by melting the chocolate in a double bowl over a saucepan of water. This is where I encountered my first real problem. The chocolate was very thick and not at all suitable for dipping in. When I tried my first two cake pops, they were literally sucked into the chocolate off the sticks. It was a disaster! I know that working with chocolate can be tricky. I think my problem in this case was that the steam from the saucepan caused the chocolate to seize. I was able to save it by adding some oil to it (my sister's suggestion) and covered another few balls before it seized again.
 |
| The two in the top right were the first two. They are darker and look messier. |
|
|
The next batch that I decorated was much more successful. I melted the chocolate in the microwave and added some copha to it. This meant it was much runnier and they coated beautifully. I decorated each one with sprinkles or piped melted chocolate on them. You need to move quickly as the chocolate sets really fast! I had some polystyrene which I covered in plastic wrap that I used to stand the cake pops in to set. (the plastic wrap protects the pops from the polystyrene and means that you can reuse it for next time.
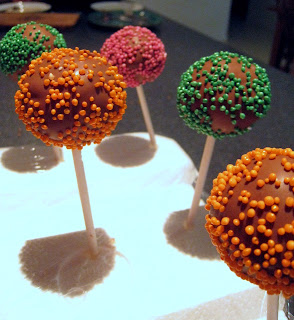 |
| This is my second batch. They look great! |
 |
| My Cake Pop. Ready to eat. |
Probably the most important thing I found about all of this is the time needed. They really aren't difficult, but they are time consuming. You need to keep the pops in the fridge while you are working, so doing them in batches works best. You will find that half a dozen at a time would work nicely. My cake pops are fairly simple compared to some I have seen. Perhaps the best blog I found on the cake pops, and definitely the most popular, most mentioned blog is
Bakerella. If you want to see some truly amazing cake pops you should head over and check them out.
Anyway, making the cake pops has been a challenge. It has frustrated me and pleased me in equal parts. I have a great bunch of friends who gave me very helpful suggestions when I was stuck with the chocolate. So to them I say a big Thanks! Their help gave me the patience to try again, and I'm glad I did as the second attempt went so much better. As they say, if at first you don't succeed and all that. As my blog post title suggests, the jury is out on whether I will make these again or not. I know that I can. I'm not sure that I want to. I guess time will tell. Perhaps the kids will get involved next time and lessen the work load. Although having said that, kids tend to increase the work load rather than lessen it!


